
Video creators, teachers, advertisers, and students alike require videos to be up to date and engaging. The problem is that taking the time to make a video that will engage an audience typically takes too long and is too much work.
Wasting time fussing over small things can hold you back and have you fretting. This is where the right editing software can really make a difference. CapCut Desktop Video Editor provides you with exciting filters and overlays that transform the look of any video in an instant.
These assets allow you to establish the mood, direct attention, and develop a unique style without master editing skills. With easy taps, your video looks professional and refined. The result is more effect, better focus, and consistent style in all of your productions.
Fun Filters and Overlays for Engaging Videos
What Overlays and Filters Do (And Why They're Useful)
Overlays and filters are quick tools that change the look and texture of a video. A filter will change color, tone, or brightness to create an aesthetic, while an overlay puts objects like shapes, stickers, or textures on top of the video. These tools save time and cut out the intricacies.
They work best for social reels, class explainer videos, event recap videos, or short promotions. The majority of content creators also use a photo editor with CapCut Desktop Video Editor to edit thumbnails and supporting images, making the whole project look consistent.
Create Mood and Theme in Seconds
Filters can instantly make any video feel warm, cool, retro, or cinematic at the touch of a button. Effects like sparkles, confetti, or holiday graphics enhance the enjoyment of an event and make moments memorable. They are suitable for school events, product releases, or holiday posts.
Teachers connect photos to lessons, while marketers connect themes to campaigns. To make it quicker, these effects can be combined with CapCut PC's AI video generator as well. This method creates clips at once, but overlays provide a fun and personal touch that creates engagement.
Guide Attention and Hide Clutter
Overlays and filters are used not only for aesthetics. They also steer attention in an easy way. Arrows and frames direct attention to important areas on the screen, while blur or glow effects fade the background, making the main subject more prominent.
Highlight stickers and boxes can mark steps or highlight key words during a lesson. At the same time, overlays hide distractions in the image and keep the video simple and clean. This becomes easier to do product demos or lessons during class.
Be Consistent and Tell Mini-stories
Consistency builds credibility for both teaching and branding. By storing your filter and overlay sets, you can keep the same appearance on multiple videos. This makes it easy to develop an image that students or clients will recognize. You can chain overlays, too, in order to guide viewers in sequence.
For example, starting with an intro banner, then pointing with an arrow, and then ending with a caption box. CapCut also has an online video editor, which you can try for free!
Pricing & Availability Note (Critical)
CapCut Desktop Video Editor is not completely free of charge. Some of the higher-end filters, overlays, or assets will only be accessible with a premium plan. It might also be dependent on your account or where you are.
Be sure to look at the available features before you begin a big project or sequence of videos. That way, you can prepare ahead of time and will not have locked tools or exporting choices.
Steps to Use Playful Filters and Overlays
Start by downloading CapCut Desktop Video Editor from the CapCut website. Install and log in to the software using your account. Create a new project by setting the resolution and frame rate appropriate to your video needs.
After opening the project, select Import and import your clips, images, and sound files. Drag these assets into the timeline in the order in which you would like to play them. Save your media stored in folders so that you can use them repeatedly in subsequent lessons or campaigns.

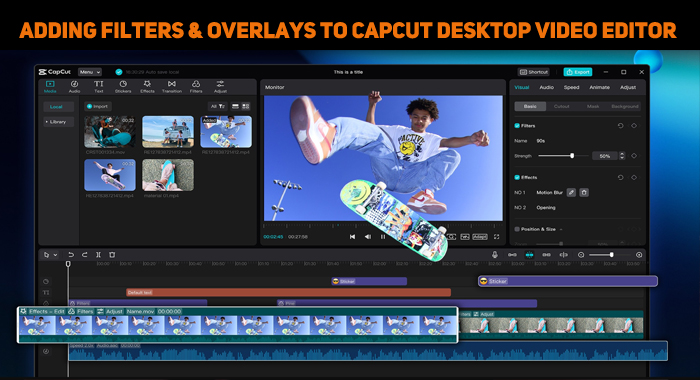
Step 2: Add Filters & Overlays
In CapCut PC, visit the Filters tab in the left menu. Swipe through the list and tap on any filter to view how it will appear on your clip. Change the intensity slider to get the desired effect. Next, click on the overlays panel.
Choose between stickers, shapes, sparkles, frames, or confetti. Drop the overlay on the timeline over your video by dragging. Adjust opacity, blend mode, and duration by adjusting settings in the right panel. Use keyframes for motion effects and Masks for overlay application to specific areas.

Once your video appears done, hit Play to verify. Make sure colors are accurate, overlays are readable, and text is apparent. When satisfied, click Export in the top-right corner of the app. Choose the resolution, frame rate, and file format that work for you.
Label your file clearly to keep your projects organized. Save export presets to apply the same settings to future videos. Export directly to share on platforms like YouTube, TikTok, or school websites without exiting CapCut Desktop Video Editor.

Fun overlays and filters in CapCut Desktop Video Editor kick every video. They establish the mood, highlight key elements, and maintain a consistent style across all your projects. This conserves time for creators, teachers, and marketers but continues to create videos that are seen.
The best outcomes are gained from light use; one filter and a few overlays seem to work better than a lot of effects layered together. Keep in mind that certain advanced features and premium overlays require payment.
Download CapCut Desktop Video Editor from the official site and start by adding one filter and two overlays to your next video.
ARTICLES CLOUD
LATEST TECHNOLOGY ARTICLES
LATEST TECHNOLOGY NEWS
Our Youtube Channels

Nettv4u

Sillaakki Dumma

Crazy Masala Food

Cinemakkaran

Thandora

AskMirchi
Copyright © 2026 NetTV4u.com


")


 Home
Home